Fermented Vegetables
How to Make Kimchi at Home for Beginners
A simple, beginner-friendly guide to making classic napa cabbage kimchi at home — salting, paste, packing, and fermenting safely.
Kimchi is fermented napa cabbage seasoned with garlic, ginger, and Korean chili flakes. It takes about 30 minutes of hands-on work, a few hours of salting, and 1 to 5 days of room-temperature fermentation before it's ready to eat. You do not need special equipment, and you do not need any previous fermentation experience.
This guide walks you through every step, explains the reasoning behind each one, and tells you exactly what to look for so you know your kimchi is safe and developing properly.
What You Need Before You Start
Equipment
- A large mixing bowl (the biggest you have)
- A sharp knife and cutting board
- A clean wide-mouth jar (half-gallon / 1.9 L works well for this batch)
- Rubber gloves (the chili paste stains skin and burns if you touch your eyes)
- A small plate or zip-lock bag filled with water to weigh down the cabbage
Cleanliness matters more than sterility. Wash your hands, bowl, knife, and jar with hot soapy water and rinse well. Dry with a clean towel. That is all the prep your gear needs.
Ingredients
- 1 medium napa cabbage (about 2 lb / 900 g)
- 2 tablespoons non-iodized salt (kosher or pickling salt; iodized salt can inhibit fermentation)
- 1 tablespoon fish sauce (or soy sauce for a vegan version)
- 4 cloves garlic, grated or pressed
- 1 teaspoon fresh ginger, grated
- 2 to 4 tablespoons gochugaru (Korean chili flakes; see substitution note below)
- 1 teaspoon sugar
- 3 green onions, sliced into 1-inch pieces
About gochugaru: This is the ingredient that gives kimchi its characteristic red color, mild heat, and slightly fruity flavor. It is sold in Korean grocery stores and many online retailers, usually in a large bag. Gochugaru is coarser and less spicy than cayenne. If you cannot find it, you can substitute a mix of mild paprika (3 parts) and cayenne (1 part) to approximate the color and heat. The flavor will be different but still good. Do not substitute straight cayenne at the same quantity; it will be far too hot.
Step 1: Salt the Cabbage
Quarter the cabbage lengthwise, then cut each quarter crosswise into 2-inch pieces. Discard the very base of the core.
Place the cabbage in your large bowl. Sprinkle the salt over it and use your hands to massage and squeeze the leaves for about 2 to 3 minutes until they start to soften. Let the cabbage sit at room temperature for 2 to 4 hours, tossing it once or twice during that time.
The salt draws water out of the cabbage through osmosis. By the end, the leaves will be limp and sitting in a pool of liquid. That wilted texture is exactly right. The salt also starts building the inhospitable environment that favors beneficial lactobacillus bacteria over harmful ones.
After 2 to 4 hours, taste a small piece. It should taste pleasantly salty, like well-seasoned food. If it is overwhelmingly salty, let it soak in cold water for 10 minutes, then drain.
Rinse and squeeze: Rinse the cabbage thoroughly under cold water two or three times to remove excess salt. Squeeze handfuls tightly to remove as much liquid as possible. You want the cabbage damp, not dripping. Set it aside in a clean bowl or colander.
Step 2: Make the Paste
In a small bowl, combine:
- Gochugaru (start with 2 tablespoons for mild; use 4 for a spicier result)
- Garlic
- Ginger
- Fish sauce (or soy sauce)
- Sugar
Stir until the mixture comes together into a rough paste. It will be thick and very red. Taste it — it should be intensely flavored, since it will be diluted across the whole batch of cabbage.
This is a simplified paste. Traditional kimchi often includes salted shrimp, Korean radish (daikon), or napa pear. Feel free to add a quarter cup of julienned daikon if you have it; it adds crunch. But the recipe above produces good kimchi without any of those additions.
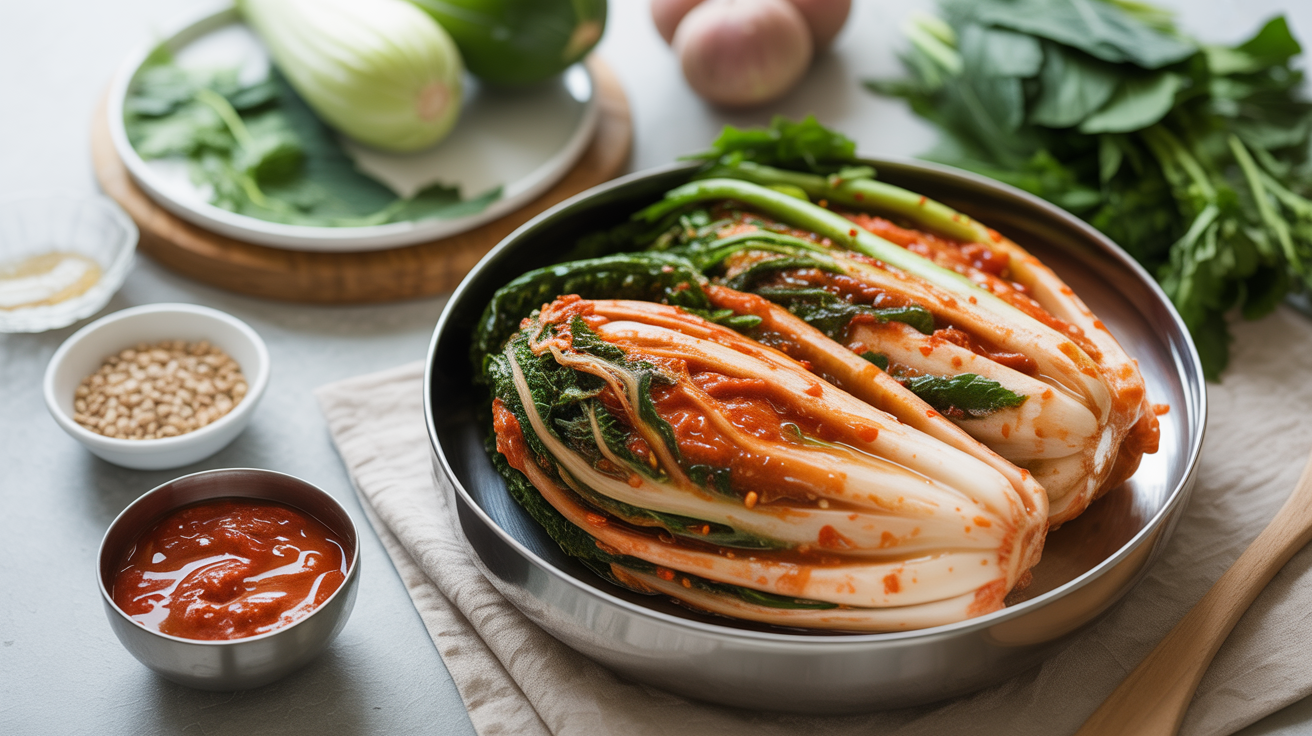
Step 3: Mix and Pack the Kimchi
Put on your gloves.
Add the green onions to the bowl with the rinsed cabbage. Spoon all of the paste on top. Use your hands to massage and toss everything together until every piece of cabbage is coated. Spend a full 2 minutes here; thorough coating helps the fermentation develop evenly.
Taste a piece. Adjust if needed: more gochugaru for heat, a drop more fish sauce for savory depth, a pinch of salt if it tastes flat.
Pack the kimchi tightly into your clean jar, pressing down firmly after each handful. You want to eliminate air pockets and encourage the liquid to rise and cover the cabbage. Leave at least 1 inch (2.5 cm) of headspace at the top; the kimchi will expand and bubble as it ferments.
If the liquid in the jar does not come up to cover the cabbage, you can mix 1 teaspoon of non-iodized salt with 1 cup (240 ml) of water and pour just enough of that brine over the top to submerge the vegetables. See how to make a salt brine for fermenting vegetables for the full explanation of brine ratios.
Place your weight on top (a small zip-lock bag of water works perfectly) to keep the cabbage pushed down below the liquid. Set the jar on a small plate to catch any overflow.
Step 4: Ferment at Room Temperature
Cover the jar loosely with a lid or cloth. Do not seal it airtight; the carbon dioxide produced during fermentation needs to escape.
Leave the jar at room temperature (65 to 75°F / 18 to 24°C) and taste it daily.
Day 1: Tastes raw and salty. The paste flavors are sharp and separate.
Day 2: The garlic and ginger have started to mellow. You may see a few bubbles. The smell is pungent.
Day 3: Tanginess begins. A light sour note appears underneath the spice. This is the lactic acid developing. Many people love kimchi at this stage.
Day 4 to 5: Noticeably sour, fully fermented, more complex. The bubbling is more active.
The speed depends on your kitchen temperature. Warmer rooms (above 72°F / 22°C) ferment faster. Cooler rooms slow things down, which often produces a more nuanced flavor.
Each day, press the cabbage back down below the liquid with a clean spoon or your weight. Keeping the vegetables submerged is the single most important food-safety step in fermentation. Submerged vegetables in a salty, acidifying environment are protected; anything left above the brine and exposed to air is not. If you ever see fuzzy white, green, or black mold, discard the batch and start over. A white film (kahm yeast) on the surface is less serious but a sign things need to be moved to the refrigerator promptly.
Stop fermenting when the kimchi tastes good to you. There is no mandatory endpoint.
Step 5: Refrigerate and Store
Once the kimchi reaches the sourness you prefer, transfer the jar to the refrigerator. Cold temperatures slow fermentation dramatically. The kimchi will continue to sour very slowly over weeks and months; it is quite good fresh, and often even better after a month in the fridge.
Properly made kimchi stored in the refrigerator keeps for 3 months or longer. As long as the vegetables stay below the brine and the kimchi smells tangy rather than rotten or putrid, it is safe to eat.
Use clean utensils every time you serve from the jar. Avoid touching the kimchi with your fingers, which introduces bacteria and contaminants from outside.
Using Your Kimchi
Eat kimchi as a side dish (banchan) alongside rice or noodles. Chop it and stir it into fried rice. Add it to a grilled cheese sandwich. Cook older, very sour kimchi into kimchi jjigae (kimchi stew) — heavily fermented kimchi is ideal for cooking because the heat mellows the sourness and deepens the flavor.
If you enjoy fermented vegetables and want to expand your skills, how to make sauerkraut is a natural next project. The technique is similar (salt, pack, submerge, ferment) with fewer ingredients. Fermented pickles are another excellent beginner project using cucumber or other firm vegetables.
Frequently Asked Questions
Is homemade kimchi safe to eat?
Yes, when made correctly. Fermented vegetables have been a safe, preserved food for thousands of years. The salt and the acid produced by fermentation create an environment that resists harmful bacteria. The key rules: keep everything submerged below the brine, use clean equipment, and trust your senses. If something smells wrong (not just pungent, but genuinely foul or like garbage), discard it.
My kimchi doesn't seem to be bubbling. Did something go wrong?
Not necessarily. Bubbling is a sign of active fermentation, but in a cooler kitchen it can be subtle. Taste it on day 2 or 3. If it is slowly developing a tangy flavor, fermentation is happening. If the kitchen is below 60°F (15°C), move the jar somewhere warmer.
Can I make kimchi without fish sauce?
Absolutely. Soy sauce is the most common substitution and produces very good vegan kimchi. You can also omit it entirely and simply add a small extra pinch of salt; the flavor will be less savory but still delicious. Miso (a teaspoon, stirred in) is another option.
How long does kimchi need to ferment before it's ready?
There is no fixed answer. It depends on your taste and your kitchen temperature. Most people find 2 to 3 days produces a fresh, mildly sour kimchi. Four to five days gives a stronger fermented character. Taste it daily and move it to the fridge when you like it.
Why is my kimchi not submerged in liquid?
Two possibilities: the cabbage was not salted long enough (the salt needs time to draw out moisture), or it was not rinsed and squeezed thoroughly enough before packing. If the jar is short on liquid, top it up with a 2% salt brine (1 teaspoon salt dissolved in 1 cup water). Press the vegetables down firmly after adding the brine.