Cultured Dairy
How to Make Milk Kefir From Grains
Learn how to make milk kefir at home with just grains and milk. Ferment ~24 hours, strain, and repeat. A simple, beginner-friendly guide.
All you need to make milk kefir is a tablespoon of kefir grains, a cup of milk, and about 24 hours at room temperature. The grains do all the work. You strain them out, drink the kefir, and drop the grains back into fresh milk to do it again.
If you've ever made homemade yogurt, kefir is actually easier. No heating the milk, no incubator, no thermometer. Just grains, a jar, and patience.
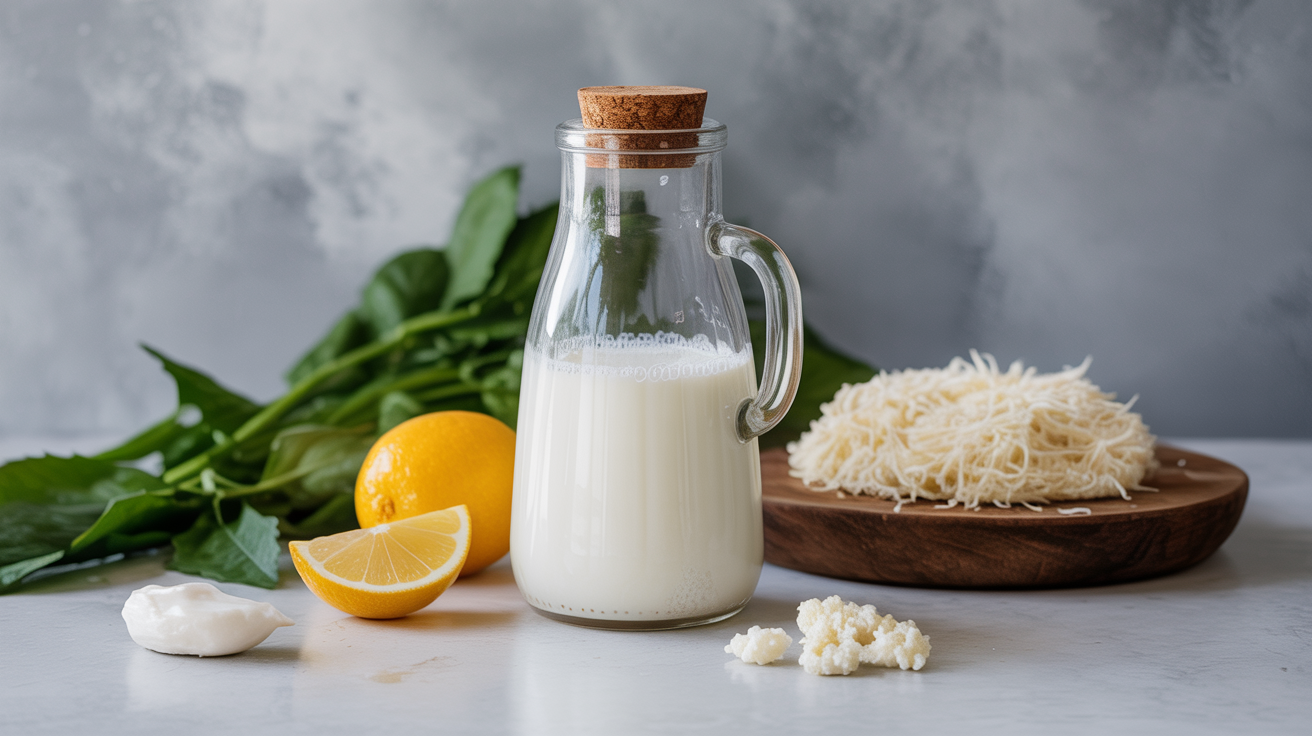
What Are Kefir Grains?
Kefir grains are not grains in the cereal sense. They're small, rubbery, cauliflower-shaped clusters of bacteria and yeast held together by a polysaccharide matrix called kefiran. They look a bit like cottage cheese curds or tiny white gummies.
These grains contain dozens of beneficial microorganisms that ferment the lactose in milk, producing lactic acid (which thickens and sours the milk), a small amount of carbon dioxide (which gives kefir its slight fizz), and trace ethanol. The result is a tangy, drinkable, probiotic-rich cultured dairy drink.
Where to Get Kefir Grains
The easiest source is someone who already makes kefir. Because grains grow over time, experienced makers usually have extras to share. Online, you can order live grains from fermentation suppliers or buy dehydrated grains (which take a few days to reactivate) from Amazon or specialty stores.
Once you have grains, you can keep them alive indefinitely by feeding them fresh milk every 24 to 48 hours. They multiply slowly and can be shared, composted, or eaten.
The Basic Method
This process works with whole, 2%, or skim milk. Whole milk produces the creamiest kefir. Raw milk works too but changes the microbial balance over time. Ultra-pasteurized (UHT) milk is not ideal because the heat treatment alters the proteins, and fermentation can be sluggish.
What You Need
- A clean glass jar (pint or quart size)
- A plastic strainer (avoid reactive metals like aluminum)
- A wooden or silicone spoon
- A breathable cover: a cloth, coffee filter, or paper towel secured with a rubber band
- About 1 tablespoon of live milk kefir grains per 1 cup of milk
Step-by-Step Instructions
- Add grains to the jar. Place roughly 1 tablespoon of live kefir grains into a clean glass jar.
- Pour in the milk. Add 1 cup of milk. For a quart jar, use up to 4 tablespoons of grains and 4 cups of milk, keeping the same 1:16 grain-to-milk ratio by weight.
- Cover loosely. Secure a breathable cloth or coffee filter over the top. The grains need airflow; a sealed lid can cause pressure buildup.
- Ferment at room temperature. Leave the jar on your counter, away from direct sunlight, for 18 to 48 hours. Most kitchens at 68 to 75°F (20 to 24°C) produce ready kefir in about 24 hours.
- Check for doneness. The kefir is ready when it has thickened slightly and smells pleasantly tangy, like sour cream or plain yogurt. You may see some separation (whey sinking to the bottom), which is normal.
- Strain out the grains. Pour the jar contents through a plastic strainer into a bowl or second jar. Gently stir or shake to encourage the kefir to pass through; the grains will stay in the strainer.
- Refrigerate the kefir. Pour the finished kefir into a clean jar and store in the refrigerator. It keeps well for up to 2 weeks and continues to sour slowly in the fridge.
- Restart the grains. Transfer the grains back into your jar, add fresh milk, and cover again. Your next batch is already underway.
Grain-to-Milk Ratio and Fermentation Time
The standard ratio is approximately 1 tablespoon of grains per 1 cup (240 ml) of milk. This is a reliable starting point, not a rigid rule. More grains relative to milk means faster fermentation; fewer grains slows things down.
Adjusting for Your Kitchen
Temperature is the biggest variable. In a warm summer kitchen (78°F+), kefir can be ready in 12 to 14 hours. In a cool kitchen below 65°F, it might take 36 to 48 hours. Start checking at the 18-hour mark by gently tilting the jar: finished kefir moves as a loose, cohesive mass rather than watery milk.
Over-fermented kefir (left too long) separates dramatically into curds and whey, gets very sour, and may smell yeasty or sharp. It's still safe to drink or use in cooking, but if you want milder kefir, strain a bit earlier next time.
If fermentation seems slow or the milk never thickens, the grains may need a few batches to "wake up," especially if they were stored or shipped. Stick with the same ratio for 3 to 5 batches and fermentation should normalize.
Taking a Break: Storing Your Grains
You don't have to make kefir every day. When you need a break, the grains can be stored without killing them.
Short break (up to 2 weeks): Place the grains in a small jar, cover with enough milk to submerge them, seal the jar, and refrigerate. The cold slows fermentation dramatically. Change the milk every 1 to 2 weeks to keep the grains fed. When you're ready to brew again, discard the storage milk, rinse the grains briefly in non-chlorinated water or fresh milk, and start a normal batch. The first one or two batches back may be slower or milder than usual.
Longer break (months): Rinse the grains in non-chlorinated water, pat them dry with a paper towel, spread on a parchment-lined plate, and let them air-dry at room temperature for 1 to 3 days until they're dry and crumbly. Store in a sealed bag or jar in the freezer. To reactivate, thaw and begin feeding with fresh milk, discarding the first few batches until fermentation returns to normal speed and flavor. Reactivation can take a week or two.
Second Ferment: Building Flavor Without Much Effort
Strained kefir is called "first ferment." If you seal it in a glass jar at room temperature for another 4 to 12 hours (without the grains), the remaining microorganisms continue working. This is the second ferment (F2), and it produces a slightly fizzier, more complex kefir.
Adding fruit, juice, or vanilla to the jar before the second ferment infuses flavor. A small handful of blueberries, a slice of lemon, or a teaspoon of vanilla extract are all popular choices.
Use a swing-top or tight-lid jar for the second ferment to trap carbonation. Open carefully over the sink, especially in warm weather, because pressure builds quickly. After F2, refrigerate the kefir to stop fermentation and preserve the fizz.
Second ferment is completely optional. Plain first-ferment kefir is nutritious and delicious on its own.
Frequently Asked Questions
Can I use non-dairy milk?
Kefir grains evolved in animal milk and need lactose to stay healthy long-term. You can ferment a batch in coconut milk or oat milk occasionally, but the grains will weaken if they never get real dairy. If you need dairy-free kefir regularly, keep a set of grains alive in cow's milk and use a tablespoon of finished kefir as a starter for your non-dairy version (understanding that it won't be as consistent as grain-fermented kefir).
My kefir separated into curds and watery liquid. Is it ruined?
No. That's just over-fermentation. The thick white layer is curds; the yellowish liquid is whey. Both are edible. Shake or blend to recombine, or strain through a fine-mesh cloth to make a thick kefir "cheese" similar to cream cheese. For your next batch, shorten the fermentation time by a few hours. If you're also struggling with yogurt texture issues, the same logic applies as in troubleshooting yogurt that won't set.
Why does my kefir taste fizzy and yeasty?
This is normal, especially in warm weather or with a high grain-to-milk ratio. The yeast component of the grains produces CO2 and small amounts of ethanol. If the yeast flavor is too strong for your taste, try fermenting at a cooler temperature, reducing the grain quantity slightly, or shortening fermentation time. Straining into a fresh milk batch more quickly keeps the yeast activity in check.
How do I know if my kefir has gone bad?
Properly fermented kefir smells sour and clean, like tangy dairy. Discard it if you see pink, orange, or black mold (not just whey separation, which is yellowish and normal), or if it smells rotten, putrid, or like acetone rather than sour milk. Keeping your jar and strainer clean between batches is the main prevention. Rinse equipment with hot water; soap residue can harm the grains, so rinse thoroughly if you do use dish soap.
Can I strain kefir to make it thicker, like Greek yogurt?
Yes. Line a fine-mesh strainer or colander with a few layers of cheesecloth, pour in your finished kefir, and let it drain in the refrigerator for 2 to 8 hours. The longer it drains, the thicker it gets. The result is a tangy, spoonable kefir "cheese" that works beautifully as a spread or dip. The technique is similar to straining yogurt for a Greek-style result, and the drained whey can be used in smoothies or bread dough.